Showing posts with label 5th Wheels. Show all posts

Monday, February 25, 2019

The RV Waste Treatment Tanks (Grey & Black)

I do not plan on explaining how to dump the grey and black tanks on your RV.  What I would like to do is to explain how to stay out of trouble in dumping your tanks and dis-spell some of the myths on when to dump your tanks.


So what are the main differences between sticks and bricks waste disposal and your RV?  First, there is no worry about getting rid of the waste at your sticks and bricks.  You let water splash into the sink and it just disappears down the drain.  No matter how much water you put into the sink.  You flush the toilet you never have to worry about sewer smell coming back-up and if the toilet gets clogged up you just plunge a few times and presto the waste is gone.

None of the above is true for your RV.  If you put too much water down your sink, you will overfill the grey water tank and the wastewater will flow into your bathtub or shower.  If you leave your waste slinky hose hooked up with the open/close valve on you RV open you will invite sewer gas and some critters, from the campground into your RV.
Do not leave your black tank dump valve open all the time when hooked to the campground sewer line.
Because your toilet is on top of your black water tank there is a limit to how much waste you can put down there as well.  Also if it gets plugged up, plunging it will not help!
So what to do.  For the smell problem that might occur in the grey water tank, I use Grey Water Tank Smell Killer.  It works. You should put a cup of Dawn Liquid Dish Soap down the kitchen sink once a month to break up grease and oil in the Grey Tank and sink P traps.
Grey Water Tank Smell Killer

As for the water back-up, you should dump your grey tank every two days while camping or sooner if the water starts to back up.  This is the tank you can dump before you leave for home.
The grey water tank should be the last tank you dump before you head for home.  After dumping it you need to add approximately 1 gallon of clean water back into it and one of the grey water tank smell killers and you are good to go.
BLACK WATER TANK

Now the black water tank the scourge of RV camping.  There are a lot of does and don'ts about this tank so let's get started.
No matter what you hear or read almost all of the sensors that are supposed to tell you how full the black water tank is, do not work.  I have been told and it has been proven that the sensors mounted on the outside of the tank do seem to do a better job than those sensors that are inside the blackwater tank.  Most of the crazy ideas floating around about how to make the sensors inside the black water tank work also do not work.  To fix the problem of, the black water tank sensors and how full is the blackwater tank.  So, how do you know when it is time to dump the tank?  Look down inside the toilet and if you see blackwater, hear gurgling, and stuff floating, it's time to dump the tank.
 So what can you do to improve how the black water tank works.
Use only quick dissolving toilet paper in this tank.  Toilet paper made just for RV is fine such as RV 2ply Toilet Paper or septic tank safe toilet paper.  But you can use just about any toilet paper that will quickly dissolve.  To test any brand of toilet paper to see if it can be used,  take a glass jar with a lid.  Fill the jar about 3/4 full and add a single sheet of your toilet paper to be tested.  Put on the lid and give the jar three quick shakes.  If most of the sheet of toilet paper is broken up and coming apart you are ok to use the toilet paper tested.

Check here for more details RV Toilet Paper Safe.

We have safe paper what next?  How about something to get rid of the smell and help break down the waste. I would suggest a Black Holding Tank Deodorizer and Dissolver
Black Holding Tank Deodorizer and Dissolver

This should be added to your black water tank regularly.  I add one tablet after each time I dump my black water tank and another during hot weather if there is a smell problem.
Oxy-Kem 


Here is another possible black tank treatment Oxy-Kem that comes highly recommended.  I have not tried it so I can't comment on how well it works, but I do plan to and will let you know.  I did get a chance to try the Oxy-Kem.  However, it was not very successful.

Here is an all natural black tank cleaner that really cleans the tank as well as the sensors.  I have not tried it myself but all of the reports I am getting say it works. Unique Black Tank Cleaner  I have tried this black tank cleaner and found that I did not like it and have stopped using it.


Lately, I have been using Firebelly Outfitters, Tank Deodorizer.  I use two packs of the deodorizer per black tank.

I have used the product for several months now and have found positive results so far.  Another positive thing is that the people who make and sell this product are RVers.

Do not dump your black tank unless it is full or nearly full.  I know what you must be thinking but we never get it full over a weekend trip.  I realize that maybe the case but, you need to fill it up manually and dump it before you leave the park.
You do not need a hose or make this a big deal just flush the toilet and insert one of these things.
 Johnny Chock


Johnny Chock
          
Let the toilet run for approximately 10 to 15 minutes depending on how full your tank is.  If you can see the water in the black tank from the toilet that is full enough.  Remove the Johnny Chock and store.  Now dump the black tank like you usually do.  Add about a gallon or more of water (you can run the toilet with the Johnny Chock for 2 to 3 minutes and that should do it.  Drop in one of your black tank tablets and you are ready for the next outing.

Never leave the black tank drain valve open.  You are just asking for the smells of your neighbor's sewer to come up into your RV.  Or if you are really unlucky you could get the "black pyramid of death".  Because the liquid drains out of the open drain valve quickly the black solids are left behind and start to pile up.  If air gets into the tank from the open valve and drys out the solids you are really in trouble.  Or if you dump your black holding tank too frequently you will also have a build up of the solid waste.  This is a problem you do not want the black pyramid and could cause a very expensive repair.  To prevent the "pyramid of death" you need to flush your black tank when it is at least 3/4 full and refill it so that there is some water splashing inside as you drive back home.

One of the things you hear and I have tried is to add one cup of cheap dishwashing liquid soap to break-up waste and Calgon to lube the inside of the tank.  Does it work?  I have been using it and have not seen much of an improvement.  I plan on using this in the grey water tank next to see if it makes a difference to that tank.


Quick Guide To Waste Tank Dumping
  1. Grey Water Tank can be dumped anytime.
  2. Use a tank treatment when needed. (to reduce smell and add microbes)
  3. Dump Black Tank when at least 3/4 full.
  4. Add a small amount of water to both tanks after dumping. (up to 2 gallons)
  5. Use the grey water to flush out sewer hoses.


Until Next Time.


Friday, July 27, 2018

Pressure And More Pressure On Your RV's Water Lines

Are you putting to much water pressure on your RV's PEX water lines and their PEX fittings?  Do you know how much pressure you can put on your RV's water lines and their  PEX fittings?
Let's take a look and see what's what.


RV manufacturers typically use PEX  PlasticTubing for all RV plumbing runs. The two sizes are commonly used, 3/8-inch and 1/2-inch. These are the standard size because the outside diameter of the tubing is about 1/8-inch greater than the called-for size. Red PEX is usually the Hot water line and Blue or Clear the cold water line.  But, not always.  There are special fittings used with this type of water line called PEX fittings.  Below are some examples of some fittings you might see under one of your sinks.

The fittings can be of any color or even colorless but they will all have the ribs you see on the fittings above.  You will also note that each PEX fitting has a crimped ring around it.  The ring looks like below.
To put the ring on the PEX tubing and secure the ring you would need a crimping tool.  Shown below.
OK, now that you understand what you currently have let's discuss the problems this type of system brings the RVer.  The whole system can leak at any time and usually does. Every connection, if it is not put on correctly, will leak at the worse possible time. Ah, you say no problem I will just squeeze the ring with my trusty pliers.  Well, your trusty pliers will not be able to squeeze the connector hard enough to seal the leak in most cases.  What to do?  Change the fitting to a more updated connector.  We will cover that in just a minute.

Why do these cheap PEX products not work well all the time?  PRESSURE, water pressure from campgrounds varies greatly and can not.  The PEX water system in an RV cannot safely go above 65 pounds of water pressure.  I will not allow mine to go over 55 pounds of pressure.  
How do I control the RV Parks water pressure with a brass water pressure regulator
Brass RV Water Regulator
 You can adjust this type of regulator to any safe water pressure you like for your RV.  This type of regulator does not affect the flow of the water just the pressure. There are lesser expensive water pressure regulators like the one shown below.


While this type will regulate the water pressure it also affects the flow of the water which some people find objectable.  Either one will protect your RV water system from to much PRESSURE.

OK, you just found a PEX fitting under the kitchen island that is leaking now what can you do to fix the problem and how much time is it going to cost you?
You should carry a few Shark Bite connectors like the ones shown below.
Shark Bite Coupler

Shark Bite T

Shark Bite to Threaded 
There are even more fittings to choose from but you get the idea.  The advantages of these types of connector are, 


  • INSTALLS IN SECONDS: 1/2 inch straight coupling requires no special tools, no soldering, no crimping or glue. Just push to create a watertight seal
  • COPPER, PEX, CPVC: SharkBite straight coupling plumbing fittings fits copper tubing, and CTS CPVC and PEX and connects all three types in any combination
  • CERTIFIED: SharkBite fittings are certified to 200 PSI and 200°F and can be reused up to four times

Now doesn't that beat the PEX connector and all the fuss it would take to fix a leaky connection?
The real story here is to control your water pressure coming into your RV.  If you do not you will find leaks and under the shower or under sink water damage.  
One other thing you may want to add a water shutoff to your toilet so in case you need to work on it you do not have to shut off all the water to the RV.

Shark Bite Shut Off


Until Next Time


And finally, please remember that this blog is an Amazon affiliate. When you order something through any of the Amazon links, it doesn’t add anything to your cost, but I do earn a small commission on everything you buy. 
Just click on an Amazon link, then shop as usual.

Thursday, April 26, 2018

Let's Check Those Tires Again!

 While some of us are still digging out of the winter storms, some of us are dreaming about the first warm weekend of the new camping year. So what do you do first with your stored RV?  Check the tire pressure with a good tire pressure gage.  The tire's max pressure is located on the side wall of the tires on your RV.  Do not use the pressures recommended by the RV manufacture UNLESS the RV has the original tires that it came with from the factory.


I use both a screw-on tire pressure indicator, such as Quick-Pressure-PSI-50-Monitor, which at a glance can tell you that you may have a problem [use only if your tires are supposed to have 50 lbs of air when cold. Other pressures are available]  and the traditional pencil like gauge, such as Pencil-Pressure Gauge
 Be sure to test or look at the tire pressure gage before you have moved your RV a mile.

You need to check the tire pressure when the tire is still cold
Another good, but pricey, system for monitoring your tire pressure as well as the tire temperature is the  Wireless Tire Pressure Monitoring System. I am saving for this one.

Wireless Tire Pressure Monitoring System

The system will tell you of an overheated tire, in most cases before it blows, and of course tell you of low pressure in any monitored tire, even the spare,  in real time no need to stop every 20 miles and check those darn tires - LOL.  When you stop for gas or a bathroom break you should do a tire check of the RV as well as a tow vehicle. My daughter was checking the tow vehicle for me and found a large cut in the sidewall of the truck tire.  We were able to get the tire replaced before the large accident occurred.  I did not even remember hitting or running over anything on the highway.
Be sure to carefully look at the tread, and the side walls both on the front and the back of the tire.  Most RV tire experts agree that if your tiers are more than five years old from the date of manufacture you should replace them.  Most tire failures occur when the side wall of the tire is under inflated or rots out from the inside where you can not see.  You can thank Mr. Sun for sidewall failure in some cases.  Most tires have a Sun inhibitor built-in but when a tire sits and sits the inhibitor does not get moved to the outside of the tire by the tire going round and round.

Now you see why you need wheel covers right? Trailer Wheel Covers for less than $25.  To protect the tires in storage from Mr. Sun and any other nasties that come along.
You can also use an RV tire protective spray which is applied, as directed, to the tire sidewall that is exposed to the sun.  I have used RV Tire Protection Spray with good luck.  This spray is NOT designed to make the tire sidewall shinier, it is not a decorative spray, but something that is designed to put back into the surface of the rubber what Mr. Sun is taking out.
RV Tire Protection Spray
Also, note that if you are going to store the RV for an extended period of time you should protect the tread from the surface that the tires are sitting on.  Nasty things can leach out of your tires into the blacktop or concrete that your RV sits on while being stored. Or from the blacktop or concrete into your tires during storage.  You can use an  Office Chair Mat that sells for less than $20,
for each side of the RV and just back onto it as you are putting the RV away.
Or you can Go to Tractor Supply or any farm supply and pick up horse stall mats

Cut to the size you need for just $20.  Now that is easy.

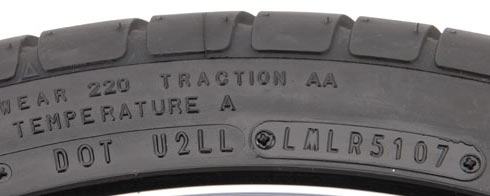
If you are supposed to replace your tires every five years how do you know when your tires were made?  There is a code date molded into the side wall of the tire. (you can thank our government)   The National Highway Traffic Safety Administration (NHTSA) requires that Tire Identification Numbers be a combination of the letters DOT, followed by ten, eleven or twelve letters and/or numbers that identify the manufacturing location, tire size, and manufacturer's code, along with the week and year the tire was manufactured.  Since 2000, the week and year the tire was produced has been provided by the last four digits of the Tire Identification Number with the 2 digits being used to identify the week immediately preceding the 2 digits used to identify the year.

Below is an example of a tire manufactured since 2000 with the current Tire Identification Number format:

In the example above DOT U2LL LMLR 5107
DOT U2LL LMLR 5107 Manufactured during the 51st week of the year
DOT U2LL LMLR 5107Manufactured during 2007
While the entire Tire Identification Number is required to be molded onto one sidewall of every tire, current regulations also require that DOT and the first digits of the Tire Identification Number must also be molded onto the opposite sidewall. Therefore, it is possible to see a Tire Identification Number that appears incomplete and requires looking at the tire’s other sidewall to find the entire Tire Identification Number.
I know you are saying to yourself,  but the RV is only three years old.  We are not talking about the year your RV was built, but the year the tires were manufactured and they may be not the same so please check.   If your tire's serial number cannot be read by you, then you need to take the tire or RV to an RV dealer or tire shop and have the tires read.  Please do not be pulling your RV with old tires that may jeopardize your families safety as well as others.   [If you want more information on tire markings and such go to Tire Tech Information]

Ok, you have checked the date code of your tires and they are in fact only three years old.  Tire pressure is up and you're ready to go.  Not so fast!

We need to discuss lug nut tightness.  Each Spring or before a major trip you should check the tightness of the lug nuts on each of the RV tires.  You need to check your owners manual for the correct setting.  My 5er has the specifications of 100ft LBS.  I use an inexpensive torque wrench, which I keep in the RV toolbox, to confirm the setting. 1/2' Torque Wrench  To keep the wrench outside of the tire rim I also use an extender. 1/2" Socket Extension The socket size depends on your lug nut size.

Tire Check Quick Guide 
1. Check all RV tires for max pressure listed on the tire sidewall.
2. Check tire tread and sidewalls for wear and cracks.
3. Cover tires from sun damage when not using.
4. Keep tires off of storage surface during storage.
5. Check the age of tires yearly.
6. Check your tires every time you stop.
7. Do maintenance on your tires as needed.
8. Check lug nut tightness.


Until Next time.


Friday, February 16, 2018

12 Volt Emergency Power & Emergency Tire Pump

When you dash off for a weekend camping vacation, most of us just don't sweat the details.  I know, I don't and that is what gets us all into trouble.  Last camping season,  the wife, grandkids, and I headed out for just such a weekend.  It was early in the season and when we got to the campsite we were the only ones around.


So far so good.  We had a great time exploring the Spring outdoors and when we were ready to go the truck would not start.  Normally that would not be a problem because we would have lots of fellow campers around us to help out.  Not this time.  There also was the time we were on our way to Branson MO to meet relatives, when one of the trailer tires decided to blow and the spare was nearly flat.  Forgot to air up the spare tire at the beginning of camping season.  Hey, it happens.  Short term memory fading as I get older.
All of this drove home the point that Murphy is always with us and bad thing happen to good people as well.  So what is the solution?  One of these, 12Volt Emergency Power & Tire Pump
What this thing does is provide emergency power to start your truck not all of the units that look like this one will start a V8 or larger engine, as well as an air station to pump-up just about anything that needs air.  You can use a standard AC extension cord as the power cord to charge the unit up.  You can even leave it plugged in for a continuous charge and not damage the unit.  Oh, it does have a DC output jack that may be used for 12volt stuff.  Also, it has a built-in tire pump that will pump up most TT and 5th wheel tires.  Again many of these combo units can't pump up RVs tires before the cows come home.  As always be sure you check your rigs tire pressure when the tire is cold not when it has been run on the road for several hours.

Due to the fact that newer 5th wheels are using tires that require more pressure than the above unit can provide.  I am suggesting that you might want to take a look at the following RV Tire Pump.  While this unit will not start your car or truck in will pump up RV tires up to 150 lbs.
High-Pressure RV Tire Pump


But I hear you say that you needed something that had AC power like the 110volts that comes out of the power pedestal that your RV is plugged into.  Fear not, because you can use one of these, 110volt and USB Dual Power Inverter

The 300W DC-AC Power Inverter with USB charging ports is designed for most major brand notebook computers, digital portables devices like, video camcorder, digital camera, iPhone, Galaxy phones and computers, iPod, cell phone, PSP handheld Game, DVD player & etc.
You may want to pick-up the battery hook-up cable just in case.  It looks like this, 12volt Battery Clip-on Accessory Socket
This device allows you to hook-up to any 12volt battery or any device that has 12volt battery clamps, such as the 12Volt Emergency Power & Tire Pump.
Some of us will like a bit more AC power than the little power converter above can provide if that is the case you might want to consider this, 1000watt Power Converter

This more powerful converter can power notebook computers, TVs, fans, refrigerators, game machines, DVDs, lights, musical instruments.  And can be powered by the 12Volt Emergency Power & Tire Pump above.  So if you need 110volt power at the picnic table or anywhere while camping, there are ways to get it that will help keep your family safe and make camping fun.

Don't forget that you can use Emergency Power at home when the lights go out to recharge your cell phones and provide power for lights.


Until Next Time


Please remember that this blog is an Amazon affiliate. When you order something through any of the Amazon links, it doesn’t add anything to your cost, but I do earn a small commission on everything you buy. Just click on an Amazon link, then shop as usual.

Wednesday, January 31, 2018

RV Dog Bones And Adapters

Many times as you travel around the country you will find that you are in need of some sort of thingy that changes what you have into something you need.  This happens most often on the electrical side of your Rig.  If you have a 50 amp rig you may find that the campground you have only has 30 amp plug-ins.  Or you may want to plug in your power pedestal power analyzer into the 30 amp or 50 amp plug-in to be sure that it is safe you plug into your rig.


Let's see what these things look like and what they are used for.  First the RV Dog Bone.
The typical RV Dog Bone is an electrical adapter that changes a 50 amp RV plug so that it can plug into the 30 amp socket of a power pedestal. The 30 Amp Male to 50 Amp Female Dog Bone  looks like this;

30 Amp Male to 50 Amp Female Dog Bone  
Of course, there may be a time when you need to plug your 30 amp Rig power cable into a 50 amp power pedestal socket  The 50 amp Male to 30 amp Female Dog Bone looks like this;

 50 amp Male to 30 amp Female Dog Bone 
Plugging in you 30 amp RV into this adapter will not harm your Rig and will give you no more power than what you should have. The reason to do this is often the power socket on the power pedestal is worn or broken and the only good one is the one your power cord will not plug into.  These RV Power Dog Bones let you mix and match to get some power.
So you have stopped by Grandma's house to spend a few days and you need a way to plug your RV into her outside power socket so you can get some lights and keep the fridge going.  What do you need well you need a 15 Amp Male plug to 30 amp Female plug . This little gadget is shown below.


                                                15 Amp Male plug to 30 amp Female plug


While these may not be all the ones you will ever need this group will get you started and cover most of the situations that you will find.  One last bit of information the industry does make Y connector so that you can get 15 amp sockets from both 50 amp and 30 amp outlets from the power pedestal.  I have shown one type below.  I do not use these myself because where I camp has always had 15 amp sockets to plug into if I need to have 15 amps at the power pedestal.  If you have a blow-up boat or kayak you might need this type of Y Adapter with 50 Amp Male Plug To RV 30 Amp and 15/20 Amp Female Connector  Shown below is what it looks like;

Y Adapter with 50 Amp Male Plug To RV 30 Amp and 15/20 Amp Female Connector

I would like to cover the pedestal power combiner.  These devices combine the power outlets of the power pedestal to give you more amps.  For example, if you combine the power output of the 30 amp socket with the power output of the 15 amp socket on the power pedestal you would get 45 amps of power to work with.  Or at least that is the theory.  Again I do not use this type of device as my Open Range 5th Wheel is 50 amps.  But to be fair I am showing you the device. The 45 amp Power Maximizer  The unit is shown below;

The 45 amp Power Maximizer  
Here is a power dog bone that I use all the time.  It is a 50 Amp right angle power adapter that takes the stress off of the power plug mounted to the trailer


Here is the 30 Amp version as well.


Click on the name of the item to learn more. 


Until next time,


Please remember that this blog is an Amazon affiliate. When you order something through any of the Amazon links, it doesn’t add anything to your cost, but I do earn a small commission on everything you buy. Just click on an Amazon link, then shop as usual.

Tuesday, February 21, 2017

Is It Level??? Is It Stable????

Is It Level??

How many times have I heard that phrase at a campground?  I can't even count them or remember them for that matter.  How do you know when your rig is level and what can you do if your rig is not?
Let's look at some of the possibilities.


The first thing you need to do is eyeball the site that you will back into or pull forward into.
Does the site appear flat?  There could be a drainage crown to the site, meaning that the center is higher than either side so that the rain water will drain off quickly if it does rain.
Maybe there is a slope in the site toward the right or left.
All of this needs to be taken into consideration when looking at the site.
Ok, you are pulling or backing into the site and you have the support of a ground crew so getting into the site is not the problem.  The door side of the rig appears lower that the street side or is it?   How do you know? Well at some point in the life of your rig someone should have put bubble levels on it.
(For you guys with money we will discuss auto leveling equipment at the end.)

They should look like theses RV Bubble Levels
RV Bubble Levels 
If you have nothing, or what you have is so small as not to be readable then an up-grade is in order.  You should mount one of these in the front of the rig where the level can be easily seen, after taking the rig to a Walmart type parking lot and using a construction level, checking that the rig is sitting truly level before you mount the above levels to the rig.  The second level is mount on the street side of the rig at the same height that you mounted the front of the rig level.  Be sure you have confirmed that construction level and the RV level agree that the rig is level.
Why you ask?  Because if you are more that 5 degrees out of level your RV refrigerator may not work or will not work efficiently.
But you may not have a TT maybe you have a 5th wheel and need something a bit bigger.  Enter the 5th wheel bubble level.  This is mounted on the pin box so you can see the level from the drivers seat.
Even if you have auto-leveling on your fiver you want to start out as close to level as you can so as to not put to much stress on the self leveling system.

Ok, you have found that the door side of the rig is low and needs to be raised up to bring that side into level.
Now the fun begins.  You will need to put something under the wheels to raise that side of the rig.  You will need what is called a RV Tire Leveling Block,
RV Tire Leveling Block
These blocks interlock so they will stay put if more than one is used and they are designed not to sink into soft soil or blacktop.  Just how many you will need to level up the low side is often just simple trial and error.
I always start with one above ground level under each tire on the low side and go from there.  Let's say that you needed two under each tire on the low side to get level.

Did you remember to pull up on them and not try to back up on them?
Better for the tires if you pull up on the leveling block rather than backing up on them.

Also did you make sure all tires were centered on the blocks not on an edge?
The axle of the tire or the hub in the middle of the tire should be centered on the leveling block.
Why? Because it puts less stress on the tires, that really do not like being off the ground in space.

Here is yet another way to level your Rig.  This one is a bit different that the square block used above, this one is a Ramp Style Leveling System and will help you level your rig from any increment between 1/2 inch and 4 inches.  This ramp style will hold up to 30,000 pounds.  If you have two axles then you will require two ramps per side.


The smaller ramp is used to chock the RV from moving once the RV is level.  The ramp with the holes in it, is the adjusting ramp. 

You have check the levels on both the front and side of the rig right?  So now what?  You need to check that the fridge is level. On way to do that is to use a Torpedo Level
 Torpedo Level
This small 8" level can be use inside the fridge or on the nearest counter next to the fridge to check to be sure that the fridge is level. (Level - not more that five degrees out of level, is very important to the good, safe, and efficient operation of an RV fridge)

You are now level so what is next? Unhooking and stabilizing the rig.
Once you are unhooked you need to put down the corner stabilizer jacks.  Most travel trailers use Scissor Jacks
Scissor Jacks
This type of jack is NOT for leveling your rig.  It is to keep the rig from moving back and forth as you move around inside.  If one of the jacks does not meet the ground you can use one or more of  the tire leveling blocks to help stabilize that corner of the rig.  As shown in the above photo a hand crank is the normal method of deploying this type of jack and can be a real pain.  There are two fixes for the hand crank used on these jacks.  One is the Stabilize Scissor Jack Socket for an electric or battery operated drill.
stabilizing Scissor Jack Socket
The second but more expensive way is to motorize RV scissor stabilizing jacks
Bearing Protectors-1.78" Hub Diameter, Stainless S
motorized RV scissor stabilizing jack
This jack is remote control and is powered off the rig so it makes the stabilizing fast and easy.

Many of the newer 5th wheels will have will have powered corner jacks and landing jacks.  Some will have auto leveling that will level and stabilize the fiver.  But what happens when you are still getting sea sick from someone walking inside the fifth wheel or travel trailer?
For the 5th wheel there are several things that can be used and have had success.
First is the Stabilizer Jack
I use these back at the bumper, where the bumper joins the frame of the fifth wheel.  The use of these has really made a difference in the movement of the trailer.

Next is the expandable wheel chock or X-chock.
This chock does double duty if you use a paddle lock to lock the chock from being removed it will stop someone from being able to steal your RV with-out a lot of work.

Your rig is now level and corner supported but, when someone walks around the inside of the rig it still does the shimmy, shimmy, shake.  Now what?  There are many suggested solutions out there to solve this problem but here is the simplest one that works.  The RV Stabilizer           

RV Stabilizer   
One of these can be added to the rear of the rig to stop side to side motion and or one can be added to the side of  the rig to stop the front to back motion.  This looks simple and it is but, it does work.

The X-Chock from above will also work on Travel Trailers to help stop motion and help to prevent theft as well.

OK, now for the guys with money.  If you would like to add remote control automatic power leveling jacks to your TT or 5er, the following is a company that has received good reviews for their lift systems; Big Foot Leveling System
Big Foot Flip Down Leveling Jack for TT

The type of DIY that is required to install this system is not in the scope of this blog.  But this type of wireless remote control system is out there and for those who would like to add automatic power leveling to their rig here is a place to start.


Until Next Time

And finally, please remember that this blog is an Amazon affiliate. When you order something through any of the Amazon links, it doesn’t add anything to your cost, but I do earn a small commission on everything you buy. Just click on an Amazon link, then shop as usual.

Friday, September 16, 2016

Basic Tools For The RVer

What tools do you need to have when RVing?  If you ask 10 RVers you will get 10 answers.  That's because we all seem to run into problems with our RV that is a bit different from the next RVer and the tools to fix the problem that arose is slightly different. But there are some basic tools of the trade, so let's talk about those.


You will find that you will need something to put whatever tools you decide to carry into something that is strong but light.  Tools have weight and it does not take too many until you have added measurable weight to your rig. So here is a toolbox that works.Simple Tool Box

Simple Tool Box

Now that we have a toolbox, lets see what needs to be in it.

A screwdriver Multi Screwdriver
Multi Screwdriver
I chose one like above because it cut down on weight and space in my tool box.  If you rather, you could buy two flat blades (one large, one small) and two Phillips screwdrivers a #2 and #1 or an  additional size of your choice.
You will need a special set of screwdrivers for use with those pesky square headed screws that are used on the inside and the outside of the rig. These special square screwdrivers are shown below.
square screw drivers
 A set of basic pliers is next.  You will need several types.  Here is an example Basic Pliers
Basic Pliers
You will also need several advanced pliers, such as the ones shown below.

Slip Joint Pliers

Vice-Grip Pliers
Vice-Grip Pliers
You will need and use all the above pliers.  It is just a matter of time.  Next we move on to crescent wrenches.
#8 Crescent Wrench (8" Crescent Wrench )
8" Crescent Wrench
#10 inch Crescent Wrench (10 inch Crescent Wrench)
10 inch Crescent Wrench

Now for the special stuff.  This is stuff you need but may not use monthly.  I use this stuff as needed.  The first is the torque wrench.  This is used to check the lug nuts on the tires of the rig to make sure they are tighten to factory specifications. I use this before each trip to check the lug nuts on the tires.  I have found that some of the wheel lug nuts do change. 

3/8 inch Extension Bar Kit


The extension bar kit is used to get the torque wrench outside of the tire rim for a safer tightening of the lug nuts that hold the tires.  You will also need a drive socket that fits your tires lug nuts and is made for a  3/8" drive.

If you have a Suburban water heater you will also need a breaker bar shown below, to remove the anode to check the anode as well as to replace the anode if needed.
3/8" Breaker Bar Wrench

Suburban Water Heater Anode
You will also need a socket that fits the anode, along with the white plumber's tape

Plumbers Tape

 to prevent water leaking around the threads.  I have always carried a spare Anode Rod just in case, you just never know when you will need one.  Be sure to change the rod yearly.

Hex Key Set


Of course a hammer is also a tool that should be carried


Hammer

To see into those dark areas around the RV you will need a small but powerful flashlight.

Cree 7W Mini LED Flashlight


One tool that I have that I really like is not really a tool but my multimeter.  I can check to see if there is voltage what kind and how much.  I can check for open and shorted wires as well as other things.  I highly recommend one for your toolkit. 
Multimeter

Another tester that is handy and some people think it should be a mandatory basic tool is the AC voltage monitor.  This shows what the park voltage is at any given time, (low voltage can damage your RV electrical system and electronics) and shows if the power pedestal is wired correctly if plugged into the pedestal before plugging in the RV.  Note: "You may have to get a Short jumper [Dog Bone] from 30 or 50 amps to standard AC wall socket to test the pedestal."  Meter is shown below.

AC Power Monitor
The following is the tool I would not be without.  The multi-tool.  I carry this tool on my belt and I even bought the expansion kit for it.  You just never know when you need a screwdriver or pliers to tighten or loosen something.

Multi-Tool


I know someone will say, this is not all you need and will give me a list of stuff as long as my arm.  Things like gorilla tape, super glue, black electrical tape, clear and white silicone caulk.  I agree they are important and should be carried, but as I said earlier. This is the basic list and like American Express "I never go RVing with-out them"


Until next time.

The Open Range RV Owners is a Facebook Group on RVing with Hints & Tips. A group for the Full-timer as well as the Newbie. In case U can't find us "Facebook.com/groups/Open Range RV Owners" we are here hoping you will join us!


And finally, please remember that this blog is an Amazon affiliate. When you order something through any of the Amazon links, it doesn’t add anything to your cost, but I do earn a small commission on everything you buy. Just click on an Amazon link, then shop as usual.