Showing posts with label Low pressure warning. Show all posts

Sunday, January 27, 2019

Do RVers Really Need A Power Management System?

I see that question all the time on Facebook and most of the Blogs that I read.  For the simple, easy, straightforward answer, YES you do.  There are so many factors involved here that I can not possibly cover them all in a single post but, I would like to cover the basics so that you can better understand why you need a Power Management system of some kind.


1. You need to know what the AC (Shore Power) voltage is inside your rig.  This is the power that indirectly powers lights, water heater, microwave, furnace, charger for the 12-volt battery system, etc.  If the voltage gets below 102 volts and should stay there for a few minutes it would be possible to sustain approximately $1200 of damage or more.

So what do you need?  You will need an AC Line Voltage Monitor.  The unit shown below is plugged into an AC wall outlet that you can see and will monitor what the line voltage is.  If it should go below 105 volts you need to unplug your rig from the outside power pedestal until the voltage goes back to normal.
AC Line Voltage Monitor
So how do you know when the outside power pedestal is back to normal.  You plug the Voltage Monitor into the 125 volts two pin socket in the power pedestal and see what the monitor reads.  It should read 110 volts or higher up to 125 volts.  The same caution goes for overvoltage.  You should unplug the rig from the power pedestal if your Voltage Monitor begins to read over 122 Volts.  Plug the Voltage Monitor into the power pedestal and watch for the voltage to drop to below 122 Volts.
Could this monitoring of the voltage be done for less money?  Yes, by using a cheap Digital Volt Meter  pictured below;
 Digital Volt Meter  

Harbor Freight often offers a cheap digital voltmeter for free, with coupon.  Watch their ads and take advantage of the offer.  You could plug the test leads that come with the meter into the meter and then the other ends of the test leads into the slots on the AC wall socket. (Caution do not leave unattended) Or you could make up a cord from a 6-foot extension cord and the test leads that come with the meter.  See below for an example.
AC Cord With Test Meter Leads

2. Next is  The Polarity Tester.  This is used to be sure that the Neutral wire of the power line is not reversed with the positive lead of the power line.  If that were to happen you could have what is called a hot-skin condition.  Meaning that if you had an aluminum skinned rig you could receive quite a shock from your rig.
 The Polarity Tester
The Polarity Tester can also tell you if the Earth Ground (the bare copper wire) is hooked up properly.  
The Earth Ground is a separate conductor which may seem to be doing nothing but, is, in fact, a protective wire. It is there, ready to take the current away to earth ground, from the body or frame of the electrical device it is connected to, makes contact with any "hot" wire. [the 120 volts mains power is carried in two current carrying conductors called "hot" and "neutral".] 
So, IF one of the "hot" conductors should contact the metal frame of the rig, or housing of an appliance, perhaps because the appliance got damaged by being dropped from a table, or similar accident,  the third wire which is the earth ground wire, which runs directly from the housing to the grounding [or earth ground bus] in the fuse or breaker panel, will in effect cause a short circuit which should blow the fuse or trip the breaker. 
This third wire also guarantees a current path back to the electrical panel where the fuse or circuit breaker protecting that circuit is located, in the event that the hot wire should come in contact with the rig's frame, but the neutral conductor should happen to have been cut or damage and become disconnected, or open. 
The idea is to guarantee that if a part of the rig, device or appliance should become "hot," which could be fatal to anyone who then came into contact with it. That the earth ground would trip/open the circuit protection device [fuse or breaker], and turn off the flow of AC current. 


To help further in checking for unwanted or wanted electricity a good investment is the, Voltage Sensor which is shown below;
 Voltage Sensor
With this probe, you do not need to touch the power line to tell if there is voltage present.  You can use this probe to find power lines behind the wall or under the floor of the Rig as well as the towing vehicle.

3.  Often times you want to know or need to know how much power something uses, especially if you keep popping a breaker or the power pedestal. The solution is Kill-A-Watt .  The unit shown below can be used to show how much power an appliance, tool or piece of electronics is using.
 Kill-A-Watt
4. Next, let's look at surge protectors for the various pieces of equipment in your Rig.  Surge Protectors protect only what is plugged into them and only for over-voltage surges.  Surge Protectors do not protect for under voltage or high voltages.  Shown below is a pair of good simple surge protectors;
Surge Protectors
There are Appliance Surge Protectors made just for appliances like microwave and coffee makers


AC refrigerators, freezers
Refrigerator/Freezer Surge Protector

These special surge protectors offer extra features like audible alarms, flashing lights, displays, etc and are to be used with just the items listed on the packaging for the one you would buy.

5.  Next is a group of power management items that will protect your entire Rig not just one item or several items in it. First is the Portable Power Management System This type of system looks at High and Low voltage protection, a time delay for air conditioning compressor startup, 3-mode surge protection, reverse polarity protection, open neutral protection, open ground protection, AC frequency protection accidental 220 Volt protection. Includes an Integrated information panel, previous error code display is weather resistant and has a built-in locking bracket so it can be chained to the power pedestal at the campground to prevent theft.  The only thing this unit cannot do is flush the black water tank.  The miracle unit we are talking about is shown below.


These portable units come in two sizes the one above 30 amp and the one shown below 50 amp.

Let's say you were involved in a lightning-caused power surge at a campground.  It is estimated you would suffer approximately $3000 to $5000 worth of damage to the electrical system of your Rig along with the things plugged into it.  The features of the 50 amp unit are the same as the 30 amp unit.
Ah, but there is more!  What happens if you do not want something portable but something more permanent in the Rig? Then you have the permanently installed units which are called Fixed Power Management Systems  These units are not really a DIY type of item but, they can be installed by the DIYer if care is taken during the installation.  The 30 amp model is shown below;
 30 Amp Fixed Power Management Systems
There is also a 50 amp version of the same unit as above and can be found here;  50 Amp Fixed Power Management Systems .  The features of both units are the same and are,  high and low voltage protection, time delay for air conditioning compressor start-up, 3 mode surge protection, surge trip indicator, reverse polarity protection, open neutral protection, open ground protection, AC frequency protection. Accidental 220V protection, with remote information display panel, and unit bypass switch.  Unfortunately, this unit also does not dump the black tank.

I hope that you now have come to the conclusion that some type of power management is needed to protect your Rig, its contents and YOU!


Until Next Time


And finally, please remember that this blog is an Amazon affiliate. When you order something through any of the Amazon links, it doesn’t add anything to your cost, but I do earn a small commission on everything you buy. Just click on an Amazon link, then shop as usual.

Friday, June 15, 2018

Propane Gas Saving Tips

I am sure most of you have noticed that gas of all kinds including diesel fuel is going up in price.  Many of us would like to stretch our Propane Gas as far as possible.  Well, there are some basic tricks of the RV lifestyle that can help you do just that.  You must have access to AC power (shore power) to make these tricks work.


The first one has to do with your hot water heater.  If your unit is a dual operating type (AC and Propane) force your unit to use AC whenever possible by shutting off your propane tanks. Turn your hot water heater off overnight.  The tank will keep the water hot to warm all night.
But your comment is, how will I cook anything?  The answer to that follows.

Second is to use induction cooking.  An induction cooktop uses magnetic energy to heat and cook whatever is in a pot or pan that a magnet can stick to.  For example, this Deluxe Burton Induction Cooktop is what I have and it works just great.  This is what it looks like;

Deluxe Burton Induction Cooktop


Here are some of the features of this Induction Cooktop ;
  • 1800-watt high-quality induction cooktop provides 10 power levels
  • Push-button controls and digital display; 180-minute timer with auto shut-off
  • 10 temperature settings; overheat sensor; in-line fuse
  • For use with induction-compatible cookware; the unsuitable-cookware detector
  • Measures 13-2/7 by 12-1/2 by 2-3/5 inches


As mentioned in the features of the cooktop you must use cookware that a magnet will stick to.  Most cookware today is aluminum and so would not work.  You do not need a completely new set of cookware just enough to get by with using the induction cooktop.
Here is an example of Induction Cookware shown below;

Induction Cookware 

Any cookware will work as long as a refrigerator magnet will stick to the bottom of the pan or pot.  Here is a chance to go to Goodwill or other secondhand shop and make a killing on induction ready cookware.  Just be sure to bring your refrigerator magnet with you.

But you are a baker by trade and need to often use the oven that came with your Rig for that purpose.  What are you to do?  Well let's look at a solution called the Infrared Countertop Oven shown below;

Infrared Countertop Oven

Some of the features of this innovative oven are shown below;

  • Digital-controlled infrared oven cooks food quickly and easily
  • Cooking methods include conduction, convection, and infrared radiant heat
  • No preheating, defrosting, or ventilation needed; dishwasher-safe parts
  • Extender ring, cooking rack, baking pan, manual, and recipes included
  • Measures approximately 14 by 14 by 16 inches
  • 3-inch Extender Ring, 2-inch rack, 10-inch baking pan 
  • Cooks up to a 16 Lb. turkey /141b ham with Extender Ring

So now we have the baking taken care of and we are not cooking with gas but electricity and so are saving gas and bucks ($). 

I heard you lady in the back row.  You are cold at night and need some heat so turning off the Propane gas is not an option.  Let's look at some options here as well.  
You could put one of these Mattress Heating Pads on your bed and plug into electric and sleep warm as toast all night.  These heated pads come in all the popular sizes King, Queen, and Twin.  I have shown the queen size below;

Mattress Heating Pads
Because heat rises this mattress type heating pad is much better than a heating blanket and will use less power to keep you toasty warm during the cold night. 
Ah, but you need to heat the Rig so you need more power, I mean heat.  Then you want a Ceramic Space Heater  This type of heater generates a lot of heat for very little electricity used.  The one pictured below is what I use.  I have a 30ft TT and use two of the Ceramic Heaters. One blowing toward the bedroom and one in the living room blowing toward the kitchen.  These heaters will cook you out of the Rig, they can generate so much heat.  I winter camp in North Texas and it can get below freezing, as we all found out in the winter of 2013/2014.  But even though my water hose froze outside, inside we were as warm as toast.  Shown below is the  Space Heater I have;

I have listed some of the features of this unit below;
  • Ceramic space heater with adjustable thermostat for comfortable warmth—ideal for home or office
  • 1500-watt high setting; 3 output options: Low, High, or Fan Only; power indicator light lets you know when it’s plugged in
  • For safety: tip-over switch with auto shut-off and overheat protection with auto shut-off; ETL listed
  • Carrying handle for easy transport; not for use in bathrooms, laundry areas, or other high-humidity rooms

      If you have a four-legged friend (Furkid) traveling with you, please take note: this unit comes with Auto Shut-Off.  If the Ceramic Heater is tipped over the heater shuts off automatically.  This is a very important feature if you are traveling with four-footed friends.  There are some clumsy two-legged friends out there as well.

      Again I remind you that these LP Gas saving tips only work if you have access to a power pedestal so you can get AC power.  With these hints, the Propane Gas becomes the backup plan and not the main source of energy for your Rig.  I know from experience that these hints and tips will work.


      Until next time.


      And finally, please remember that this blog is an Amazon affiliate. When you order something through any of the Amazon links, it doesn’t add anything to your cost, but I do earn a small commission on everything you buy. 

      Thursday, April 26, 2018

      Let's Check Those Tires Again!

       While some of us are still digging out of the winter storms, some of us are dreaming about the first warm weekend of the new camping year. So what do you do first with your stored RV?  Check the tire pressure with a good tire pressure gage.  The tire's max pressure is located on the side wall of the tires on your RV.  Do not use the pressures recommended by the RV manufacture UNLESS the RV has the original tires that it came with from the factory.


      I use both a screw-on tire pressure indicator, such as Quick-Pressure-PSI-50-Monitor, which at a glance can tell you that you may have a problem [use only if your tires are supposed to have 50 lbs of air when cold. Other pressures are available]  and the traditional pencil like gauge, such as Pencil-Pressure Gauge
       Be sure to test or look at the tire pressure gage before you have moved your RV a mile.

      You need to check the tire pressure when the tire is still cold
      Another good, but pricey, system for monitoring your tire pressure as well as the tire temperature is the  Wireless Tire Pressure Monitoring System. I am saving for this one.

      Wireless Tire Pressure Monitoring System

      The system will tell you of an overheated tire, in most cases before it blows, and of course tell you of low pressure in any monitored tire, even the spare,  in real time no need to stop every 20 miles and check those darn tires - LOL.  When you stop for gas or a bathroom break you should do a tire check of the RV as well as a tow vehicle. My daughter was checking the tow vehicle for me and found a large cut in the sidewall of the truck tire.  We were able to get the tire replaced before the large accident occurred.  I did not even remember hitting or running over anything on the highway.
      Be sure to carefully look at the tread, and the side walls both on the front and the back of the tire.  Most RV tire experts agree that if your tiers are more than five years old from the date of manufacture you should replace them.  Most tire failures occur when the side wall of the tire is under inflated or rots out from the inside where you can not see.  You can thank Mr. Sun for sidewall failure in some cases.  Most tires have a Sun inhibitor built-in but when a tire sits and sits the inhibitor does not get moved to the outside of the tire by the tire going round and round.

      Now you see why you need wheel covers right? Trailer Wheel Covers for less than $25.  To protect the tires in storage from Mr. Sun and any other nasties that come along.
      You can also use an RV tire protective spray which is applied, as directed, to the tire sidewall that is exposed to the sun.  I have used RV Tire Protection Spray with good luck.  This spray is NOT designed to make the tire sidewall shinier, it is not a decorative spray, but something that is designed to put back into the surface of the rubber what Mr. Sun is taking out.
      RV Tire Protection Spray
      Also, note that if you are going to store the RV for an extended period of time you should protect the tread from the surface that the tires are sitting on.  Nasty things can leach out of your tires into the blacktop or concrete that your RV sits on while being stored. Or from the blacktop or concrete into your tires during storage.  You can use an  Office Chair Mat that sells for less than $20,
      for each side of the RV and just back onto it as you are putting the RV away.
      Or you can Go to Tractor Supply or any farm supply and pick up horse stall mats

      Cut to the size you need for just $20.  Now that is easy.

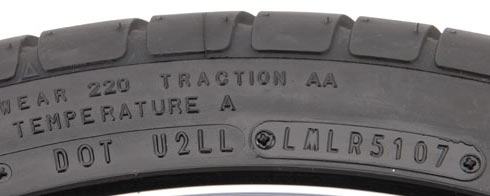
      If you are supposed to replace your tires every five years how do you know when your tires were made?  There is a code date molded into the side wall of the tire. (you can thank our government)   The National Highway Traffic Safety Administration (NHTSA) requires that Tire Identification Numbers be a combination of the letters DOT, followed by ten, eleven or twelve letters and/or numbers that identify the manufacturing location, tire size, and manufacturer's code, along with the week and year the tire was manufactured.  Since 2000, the week and year the tire was produced has been provided by the last four digits of the Tire Identification Number with the 2 digits being used to identify the week immediately preceding the 2 digits used to identify the year.

      Below is an example of a tire manufactured since 2000 with the current Tire Identification Number format:

      In the example above DOT U2LL LMLR 5107
      DOT U2LL LMLR 5107 Manufactured during the 51st week of the year
      DOT U2LL LMLR 5107Manufactured during 2007
      While the entire Tire Identification Number is required to be molded onto one sidewall of every tire, current regulations also require that DOT and the first digits of the Tire Identification Number must also be molded onto the opposite sidewall. Therefore, it is possible to see a Tire Identification Number that appears incomplete and requires looking at the tire’s other sidewall to find the entire Tire Identification Number.
      I know you are saying to yourself,  but the RV is only three years old.  We are not talking about the year your RV was built, but the year the tires were manufactured and they may be not the same so please check.   If your tire's serial number cannot be read by you, then you need to take the tire or RV to an RV dealer or tire shop and have the tires read.  Please do not be pulling your RV with old tires that may jeopardize your families safety as well as others.   [If you want more information on tire markings and such go to Tire Tech Information]

      Ok, you have checked the date code of your tires and they are in fact only three years old.  Tire pressure is up and you're ready to go.  Not so fast!

      We need to discuss lug nut tightness.  Each Spring or before a major trip you should check the tightness of the lug nuts on each of the RV tires.  You need to check your owners manual for the correct setting.  My 5er has the specifications of 100ft LBS.  I use an inexpensive torque wrench, which I keep in the RV toolbox, to confirm the setting. 1/2' Torque Wrench  To keep the wrench outside of the tire rim I also use an extender. 1/2" Socket Extension The socket size depends on your lug nut size.

      Tire Check Quick Guide 
      1. Check all RV tires for max pressure listed on the tire sidewall.
      2. Check tire tread and sidewalls for wear and cracks.
      3. Cover tires from sun damage when not using.
      4. Keep tires off of storage surface during storage.
      5. Check the age of tires yearly.
      6. Check your tires every time you stop.
      7. Do maintenance on your tires as needed.
      8. Check lug nut tightness.


      Until Next time.


      Monday, April 11, 2016

      Keep Track Of Your Tire Pressure And Temperature

      I read all the time that one of the biggest fears people have when RVing is a blown tire and the massive amount of damage that it can cause.  But I rarely read about a Fulltimer or a Newbie adding or adjusting a Tire Pressure Monitoring System (TPMS).  Why?  I doubt that every RV sold comes with a tire monitoring system. I just got back from one of the big RV shows and not one 5th wheel that I looked at came with a TPMS nor did a single salesman recommend a tire monitoring system during the sales presentation.  I also read that more than 60% of the RVs on the road today are overloaded or worse that the tire pressure on the RV is below the manufacturer's recommended tire pressure.  To make it worse [if that is possible] many of the  RVs going down the highway, are going at  70 mph or higher. Even though the RV's tires are marked not to exceed 65 mph.  As we get our RVs ready for another season of camping, let's look at what we need to do to be safer going down the road and monitoring our tires.  


      1. 
      You need to check the tire pressure when the tire is still cold


      It has been shown, by an  infrared thermometer, that after only 10 minutes of Summer Sun, that the temperature of RV tires have risen above COLD and should not be measured for pressure and thought to be cold.  After you have driven 1 mile the RV tires are not considered cold and should not be tested for pressure as being cold. 

      2.
      When you stop for gas or a bathroom break, you should do a tire check of the RV as well as the tow vehicle. My daughter was checking the tow vehicle for me and found a large cut in the sidewall of the truck tire.  We were able to get the tire replaced before the large accident occurred.  I did not even remember hitting or running over anything on the highway.

      3.
      Before starting out on the RVing trip be sure to carefully look at the tread, and the side walls both on the front and the back of the tire.  Most RV tire experts agree that if your RV tires are more than five years old from the date of manufacture [shown in a code on the tire] you should replace them. 

      4.
      Most tire failures occur when the side wall of the tire is under inflated or rots out from the inside where you can not see. Remember you are riding on air, the tire just keeps the air captured and held in place.  You can thank Mr. Sun for sidewall failure in some cases.  Most tires have a Mr. Sun inhibitor built-in but when a tire sits and sits the inhibitor does not get moved to the outside of the tire by the tire going round and round.  Now you see why you need wheel covers right? Trailer Wheel Covers   for less than $25. 


      OK, I have exposed you to some of the basic safety things you need to do, now let's look at those Tire Pressure Monitoring Systems.
      A good system for monitoring your tire pressure as well as the tire temperature is the  Wireless Tire Pressure Monitoring System .


      Wireless Tire Pressure Monitoring System

      The system will tell you of an overheated tire, in most cases before it blows, and of course tell you of low pressure in any monitored tire, even the spare, in real time. 
      • Monitors up to 22 wheels (0-232 psi)
      •  Quickly reacts to abnormal pressure or temperature
      • Waterproof & Dustproof sensors; 
      • Customizable Tire Pressure Monitoring Criteria
      • Sensor Alarm system included; Locking Ring to Guard Against Theft
      • For use in RVs, SUVs, Caravans, Trucks, & Passenger cars


      RV Flow-Through 6 Tire Sensor - Tire Pressure  Monitoring System (TPMS)


      RV Flow-Through 6 Tire Sensor - Tire Pressure Monitoring System (TPMS)


      • The flow-through sensor with replaceable battery can be secured to prevent loss or theft
      • Portable monitor has rechargeable battery and monitors tire pressure 0-199 PSI & temperature
      • Monitor tires 24/7: low/high pressure, high temperature, and slow leaks.
      • Monitor warning thresholds are user adjustable; low-pressure alert level is per axle adjustable.
      • Tire sensor signals have excellent range and not require signal booster for most vehicles


      As a lower cost alternative, you can use a screw-on tire pressure indicator, such as Quick-Pressure-PSI-50-Monitor, which at a glance can tell you that you may have a problem [use only if your tires are supposed to have 50 lbs of air when cold. Other pressures are available]  and the traditional pencil like gauge, such as Pencil-Pressure Gage .  


      A low-cost way to check the tire and the tire hub temperatures is to use a non-contact  Infrared temperature gun.  Such as the HDE Non-Contact Infrared IR Temperature Gun Digital Thermometer

      As you stop during your travels you can check the tire temperature and hub of each tire.  They should be with-in a few degrees of each other.  If you find a tire or hub that is very much higher than the rest you should take action to find out why before you proceed.

      The first thing you should do is to check the air pressure of the tire that is over heating.  I know that you have been traveling awhile but the pressure in the HOT tire should be with-in a few pounds of the rest of the tires on the rig.  You might want to consider a digital tire pressure gauge such as the NorthONE Digital Tire Pressure Gauge.

      Just be sure that the gauge you buy can read pressures above those that your tire is supposed to have in it.

      To protect the tires in storage from Mr. Sun and any other nasties that come along.  You can also use an RV tire protective spray which is applied, as directed, to the tire side wall that is exposed to the sun.
      I have used RV Tire Protection Spray with good luck.  This spray is not designed to make the tire side wall shinier, it is not a decorative spray, but something that is designed to put back into the surface of the rubber what Mr Sun is taking out.
      RV Tire Protection Spray
      Also note, that if you are going to store the RV for an extended period of time you should protect the tread of the tire from the surface that the tires are sitting on.  Nasty things can leach out of your tires into the blacktop or concrete that your RV sits on while being stored. Or from the blacktop or concrete into your tires during storage.  You can use an  Office Chair Carpet Protector 

      as a way to protect your tires during storage.  It is an inexpensive solution to tire protection during storage.

      I hope this better explains why it is important to know what is going on with your tires and also helps with the fear factor.


      Until next time.

      The Open Range RV Owners is a Facebook Group on RVing with Hints & Tips. A group for the Full-timer as well as the Newbie or Wanna B. In case U can't find us "Open Range RV Owners Group" we are here hoping you will join us!

      And finally, please remember that this blog is an Amazon affiliate. When you order something through any of the Amazon links, it doesn’t add anything to your cost, but I do earn a small commission on everything you buy. Just click on an Amazon link, then shop as usual.