Monday, October 29, 2018

How To Stay Warm Inside The RV When It Is Cold Outside

There is a group of us RVers that like to camp all year long and we live where that is possible.  Some of us Cold Weather RVers have little choice and must be in our RV all year long.  So how can you stay warm inside the RV when the world around you is just too cold?


Let's be clear on one point. If you have a rig that can take the cold it can only take it if the main furnace is set to keep the inside of the rig above freezing.  Most all weather rigs must have the furnace running to keep water pipes that run inside the rig from freezing.  That includes the black tank and grey water tanks as well. So you will need to keep the rig furnace going but you do not need it running at 72 degrees.

Let's talk about keeping you warm and comfortable.  I suppose we could all dress like Eskimos, but that seems a bit much for just reading a book inside our rig or maybe eating dinner.
You could wrap yourself in an electric throw blanket and be comfortable, like this one.

If you added these to your feet you would be warm as toast.

OR
These Footies or Snoozies and the electric throw you should be able to sit around and enjoy TV or read a good book.
But what about sleeping in bed?  That is a good question, so let's take a look at that.
You could put one of these Mattress Heating Pads on your bed and plug into electric and sleep warm as toast all night.  These heated pads come in all the popular sizes King, Queen, and Twin.  I have shown the queen size below;

Mattress Heating Pads
Because heat rises this mattress type heating pad is much better than a heating blanket and will use less power to keep you toasty warm during the cold night.  That might be good for the sleeping time but what about being up and moving around the rig?

Ah, but you need to heat the Rig so you need more power, I mean heat.  Then you want a Ceramic Space Heater  This type of heater generates a lot of heat for very little electricity used.  The one pictured below is what I use.  I use two of the Ceramic Heaters. One blowing toward the bedroom and one in the living room blowing toward the kitchen.  These heaters will cook you out of the Rig, they can generate so much heat.  I winter camp in North Texas and it can get below freezing, as we all found out in the winter of 2013/2014.  But even though my water hose froze outside, inside we were as warm as toast.  Shown below is the  Space Heater I have;


I have listed some of the features of this unit below:
  • Small Heater Measures: 6.2" X 4.74" x 8.3" . 
  • Three Modes Heater With Fan: 1.High Heat (1500-watt), 2. Low Heat(750-watt ), 3. Fan Only.
  • FOR SAFETY: 1.Automatic overheat system will shut the unit off when the parts of the heater overheat. 2. TIP-OVER SWITCH will shut off unite when tipped forward or backward.

    If you have a four-legged friend (Furkid) traveling with you, please take note: this unit comes with Auto Shut-Off.  If the Heater is tipped over the heater shuts off automatically.  This is a very important feature if you are traveling with four-footed friends.  There are some clumsy two-legged friends out there as well.

    There are other options to keep warm in the RV you could also use one or more of these oil filled heaters.

    The simple controls allow users to customize their heat with an adjustable thermostat and three temperature settings, and the ComforTemp setting maintains an optimal room temperature while conserving energy. The heater never requires refilling, and the anti-freeze technology automatically turns the unit on when the temperature drops below 42 degrees.
    Oil heaters are quiet and run about 10.5 cents an hour to operate which can be a money saver compared to other types of heaters. 

     I know from experience that these hints and tips will work. They keep the family warm during our cold weather camping, which we enjoy most of the time. 


    Until next time.

    And finally, please remember that this blog is an Amazon affiliate. When you order something through any of the Amazon links, it doesn’t add anything to your cost, but I do earn a small commission on everything you buy. 
    Just click on an Amazon link, then shop as usual.

    Saturday, September 22, 2018

    RV Security On The Road And In Storage

    It is that time of year again when most of us will have to store our RVs until next Spring. We all do the Winterizing like we are suppose to.  But how many of us even worry about someone coming along and stealing our RV?  Well, we should.  Let's take a look at what you can do to protect your, very expensive RV from being stolen.
    Because I live in the city, I can't store my Open Range 3X anywhere on my property or on the street. So like a lot of city dwellers I have to put my RV in storage when I am not using it.  To my shock and amazement, two units were stolen right out of the storage lot that I use.  To add insult to injury, the storage lot had a guard on site, a security system for entrance, and security cameras.  But the same guy managed to get two units out of the locked lot.  Well, thanks to the security cameras they caught the guy.  But what can you and I do to make our units harder to steal and more secure.  Let's look.


    First, we can add a lock to the ball area of a TT and a 5th Wheel Hitch Lock. Let's look at both.  The TT ball lock looks like below.


    • One size fits all (from 1-7/8", 2", to 2-5/15", all coupler types)
    • Keyhole cover slides up to seal out dirt and grime
    • Type A key which is a spring loaded, 7 pin, high-security key. Resists attempted drill outs. Rugged and durable, the key will not bend or break.
    • Huge 6 tooth, 3/8" dual ratchet locking system
    • Hardened 5/8" 16mm steel shackle

    Now that should slow down anyone trying to take the TT quickly.  Now let's look at what can be done to slow down the would-be thief stealing a 5er.  See below for the 5th Wheel Anti-Theft device

    5th Wheel Anti-Theft device
    This unit slides over the hitch pin and prevents the hitch pin from being attached to, by the hitch receiver. Simple but effective to slow down our would-be thief.

    I think we could do more. How about we lock the tires so the RV cannot be moved without putting new tires on the RV? Shown below is an RV Dual Wheel Stop with Padlock
     RV Dual Wheel Stop with Padlock

    • Secure tandem tires to prevent movement while parked or re-hitching
    • Fits 26" to 30" diameter tires with tire spacing of 3-1/2" to 5-1/2"
    • Includes, padlock
    • Easy grip handle for easy installation
    • Lightweight and durable

    This should slow them up but what about something even better?  Let's look at the X Wheel Stop with Padlock.
     X Wheel Stop with Padlock.

    While the lock for this heavy-duty unit is extra (a Master Lock, that you supply) it will be well worth it if it slows down someone trying to take your RV.  In most cases, if it is hard to take or time-consuming to take the thief will move on to easier pickings.

    We have protected (to the best of our ability) someone trying to take your RV but what about protecting the expensive stuff inside the RV and in the storage bay.  Let's take a look on how to help protect those areas.

    First the entrance doors.  Did you know that the key to your RV has been duplicated many times by the manufacturer of your RV?  Did you know that almost any thief can come up with a key that fits your RV doors?
    So let's look at a lock that is a bit safer. The Keyless RV Door Lock
    Keyless RV Door Lock

    • No wiring needed; uses 4 AA batteries (not included) It's retrofittable in most RV entry doors and it's easy to install.
    •  Programmable with a 4 digit PIN number The large buttons are easy to see and use Proximity sensing which illuminates the buttons.
    • Self-contained electronic RV latch with Capacitive Touch Technology
    • Offers hassle-free touchpad access: no key or fob to carry with you.
    • An integral touchpad to the latch which controls the deadbolt
    • Deadbolt key will always be able to operate the paddle or deadbolt lock in case of the user forgetting the code or having a dead battery, 8-inch x 5-inch x 4-inch.
    You don't even need a key to get this lock to open after you enter your personal pin number.  So it will not be a big deal if you lock your keys in the RV. By mistake, of course.

    Let's take a look at the outside storage compartment locks.  Did you know that's the lock code for your storage compartment lock is CH751?  This is the most common lock used on TT and 5th wheels today.  So anyone can get in. Let's look at a better idea. The RV Storage Compartment Combi Lock.

    RV Storage Compartment Combi Lock
    • Cylinder length 1-1/8"" - accommodates material thickness up to 7/8" thick
    • Durable solid metal
    • 1,000 possible combinations- set your own code
    • Retrofits any standard cam lock
    • Comes with 3/4" prong washer, 1-1/2" offset cam, 3/4" straight cam, 1-1/2" straight cam and a 90 degree stop.

    This type of lock is a direct replacement to what comes on most TTs and 5ers. You take off the old one and measure the hole opening and the length of the shaft and order the same size as the one you have.


    Follow the installation instructions and you are done. A really simple install.


    Until Next Time


    And finally, please remember that this blog is an Amazon affiliate. When you order something through any of the Amazon links, it doesn’t add anything to your cost, but I do earn a small commission on everything you buy. 

    Saturday, August 18, 2018

    Can You Hear Me Now? Breaker Breaker 1..9.....

    For this post, I would like to discuss keeping in touch with the family while camping.  Many people in the good old days, used string and two soup cans or a CB walkie-talkie to keep in touch with family members during camping.  Most of the campers in the olden time and even RVers today, nothing was or is used to stay in touch.  While some may believe that a cell phone is good enough, and it may be traveling down the interstate, in a campground in the wilderness or at the nearby lake you may find that the good old cell phone does not work, even a little.   You may find that the carrier you have is the wrong carrier for good service in the area that you are in and that the other guy would have been a better choice.  Whatever the case, today we have very small radios called FRS/GMRS that will last a long time on batteries, give you several miles of range, be quiet and can even be set up for "selective call" so only your family members will hear you when you call them in for lunch or are backing up the rig.  RVers who are backpackers take note, these little radios can have weather radios and GPS built-in as well.


    Let's take a look at a few [shown below] and discuss their features and benefits in more detail.

    Shown above are some Basic FRS radios.  They come as a pair when you buy them and have the following feature set.  The units come with rechargeable batteries, two belt clips, charging cable, AC adapter and have a range of 20 miles over flat and open terrain.  They offer a 12hr battery life.  As you can see the unit does not offer a lot of features but it works and could be used when backing the RV into that tight site, right next to the lake.


    Above is shown a step-up model of an FRS/GMRS radio.  It can run on alkaline batteries for up to 10hrs or 8hrs on rechargeable batteries.  This model from Motorola includes 11 weather channels, 22 talk channels, and each channel has 121 privacy codes, (selective call)  for privacy.  The range is 23 miles over flat and open terrain.  It comes with belt clips and 1 dual drop-in charger to charge the pair of radios at the same time to save you time.  Use one as a base station at the RV and give the other one to whoever you want to keep track of.  Additional units can be purchased so everyone who needs one has one.  This unit would be great for a fisherman to keep in touch while out in the boat on the lake.


     Calling all Backpacking RVers out there.  Here is an FRS/GMRS radio that has a built-in GPS or a GPS that has a built-in FRS/GMRS radio.  This unit is not low cost, but it does show that just about any need for communications while RVing can be met with an FRS/GMRS radio.  For the fun of it here are some of the features of this radio.  The radio has a 2.6-inch color touchscreen that is glove friendly.  A high sensitivity GPS receiver, a rugged waterproof case. Runs 18hrs on a set of batteries, and has a list of accessories as long as your arm. 
    While most of us will want a lower cost unit you need not suffer from little to no features.  Range, the number of channels, the privacy feature (selective call), and battery life are the important ones to watch out for.
    Safety and peace of mind make the weekend RV getaway fun and exciting for the whole family and the ability to stay in touch with all members of the camping party does that for me and my family.


    Until next time.  Over and Out?

    Friday, July 27, 2018

    Pressure And More Pressure On Your RV's Water Lines

    Are you putting to much water pressure on your RV's PEX water lines and their PEX fittings?  Do you know how much pressure you can put on your RV's water lines and their  PEX fittings?
    Let's take a look and see what's what.


    RV manufacturers typically use PEX  PlasticTubing for all RV plumbing runs. The two sizes are commonly used, 3/8-inch and 1/2-inch. These are the standard size because the outside diameter of the tubing is about 1/8-inch greater than the called-for size. Red PEX is usually the Hot water line and Blue or Clear the cold water line.  But, not always.  There are special fittings used with this type of water line called PEX fittings.  Below are some examples of some fittings you might see under one of your sinks.

    The fittings can be of any color or even colorless but they will all have the ribs you see on the fittings above.  You will also note that each PEX fitting has a crimped ring around it.  The ring looks like below.
    To put the ring on the PEX tubing and secure the ring you would need a crimping tool.  Shown below.
    OK, now that you understand what you currently have let's discuss the problems this type of system brings the RVer.  The whole system can leak at any time and usually does. Every connection, if it is not put on correctly, will leak at the worse possible time. Ah, you say no problem I will just squeeze the ring with my trusty pliers.  Well, your trusty pliers will not be able to squeeze the connector hard enough to seal the leak in most cases.  What to do?  Change the fitting to a more updated connector.  We will cover that in just a minute.

    Why do these cheap PEX products not work well all the time?  PRESSURE, water pressure from campgrounds varies greatly and can not.  The PEX water system in an RV cannot safely go above 65 pounds of water pressure.  I will not allow mine to go over 55 pounds of pressure.  
    How do I control the RV Parks water pressure with a brass water pressure regulator
    Brass RV Water Regulator
     You can adjust this type of regulator to any safe water pressure you like for your RV.  This type of regulator does not affect the flow of the water just the pressure. There are lesser expensive water pressure regulators like the one shown below.


    While this type will regulate the water pressure it also affects the flow of the water which some people find objectable.  Either one will protect your RV water system from to much PRESSURE.

    OK, you just found a PEX fitting under the kitchen island that is leaking now what can you do to fix the problem and how much time is it going to cost you?
    You should carry a few Shark Bite connectors like the ones shown below.
    Shark Bite Coupler

    Shark Bite T

    Shark Bite to Threaded 
    There are even more fittings to choose from but you get the idea.  The advantages of these types of connector are, 


    • INSTALLS IN SECONDS: 1/2 inch straight coupling requires no special tools, no soldering, no crimping or glue. Just push to create a watertight seal
    • COPPER, PEX, CPVC: SharkBite straight coupling plumbing fittings fits copper tubing, and CTS CPVC and PEX and connects all three types in any combination
    • CERTIFIED: SharkBite fittings are certified to 200 PSI and 200°F and can be reused up to four times

    Now doesn't that beat the PEX connector and all the fuss it would take to fix a leaky connection?
    The real story here is to control your water pressure coming into your RV.  If you do not you will find leaks and under the shower or under sink water damage.  
    One other thing you may want to add a water shutoff to your toilet so in case you need to work on it you do not have to shut off all the water to the RV.

    Shark Bite Shut Off


    Until Next Time


    And finally, please remember that this blog is an Amazon affiliate. When you order something through any of the Amazon links, it doesn’t add anything to your cost, but I do earn a small commission on everything you buy. 
    Just click on an Amazon link, then shop as usual.

    Friday, June 15, 2018

    Propane Gas Saving Tips

    I am sure most of you have noticed that gas of all kinds including diesel fuel is going up in price.  Many of us would like to stretch our Propane Gas as far as possible.  Well, there are some basic tricks of the RV lifestyle that can help you do just that.  You must have access to AC power (shore power) to make these tricks work.


    The first one has to do with your hot water heater.  If your unit is a dual operating type (AC and Propane) force your unit to use AC whenever possible by shutting off your propane tanks. Turn your hot water heater off overnight.  The tank will keep the water hot to warm all night.
    But your comment is, how will I cook anything?  The answer to that follows.

    Second is to use induction cooking.  An induction cooktop uses magnetic energy to heat and cook whatever is in a pot or pan that a magnet can stick to.  For example, this Deluxe Burton Induction Cooktop is what I have and it works just great.  This is what it looks like;

    Deluxe Burton Induction Cooktop


    Here are some of the features of this Induction Cooktop ;
    • 1800-watt high-quality induction cooktop provides 10 power levels
    • Push-button controls and digital display; 180-minute timer with auto shut-off
    • 10 temperature settings; overheat sensor; in-line fuse
    • For use with induction-compatible cookware; the unsuitable-cookware detector
    • Measures 13-2/7 by 12-1/2 by 2-3/5 inches


    As mentioned in the features of the cooktop you must use cookware that a magnet will stick to.  Most cookware today is aluminum and so would not work.  You do not need a completely new set of cookware just enough to get by with using the induction cooktop.
    Here is an example of Induction Cookware shown below;

    Induction Cookware 

    Any cookware will work as long as a refrigerator magnet will stick to the bottom of the pan or pot.  Here is a chance to go to Goodwill or other secondhand shop and make a killing on induction ready cookware.  Just be sure to bring your refrigerator magnet with you.

    But you are a baker by trade and need to often use the oven that came with your Rig for that purpose.  What are you to do?  Well let's look at a solution called the Infrared Countertop Oven shown below;

    Infrared Countertop Oven

    Some of the features of this innovative oven are shown below;

    • Digital-controlled infrared oven cooks food quickly and easily
    • Cooking methods include conduction, convection, and infrared radiant heat
    • No preheating, defrosting, or ventilation needed; dishwasher-safe parts
    • Extender ring, cooking rack, baking pan, manual, and recipes included
    • Measures approximately 14 by 14 by 16 inches
    • 3-inch Extender Ring, 2-inch rack, 10-inch baking pan 
    • Cooks up to a 16 Lb. turkey /141b ham with Extender Ring

    So now we have the baking taken care of and we are not cooking with gas but electricity and so are saving gas and bucks ($). 

    I heard you lady in the back row.  You are cold at night and need some heat so turning off the Propane gas is not an option.  Let's look at some options here as well.  
    You could put one of these Mattress Heating Pads on your bed and plug into electric and sleep warm as toast all night.  These heated pads come in all the popular sizes King, Queen, and Twin.  I have shown the queen size below;

    Mattress Heating Pads
    Because heat rises this mattress type heating pad is much better than a heating blanket and will use less power to keep you toasty warm during the cold night. 
    Ah, but you need to heat the Rig so you need more power, I mean heat.  Then you want a Ceramic Space Heater  This type of heater generates a lot of heat for very little electricity used.  The one pictured below is what I use.  I have a 30ft TT and use two of the Ceramic Heaters. One blowing toward the bedroom and one in the living room blowing toward the kitchen.  These heaters will cook you out of the Rig, they can generate so much heat.  I winter camp in North Texas and it can get below freezing, as we all found out in the winter of 2013/2014.  But even though my water hose froze outside, inside we were as warm as toast.  Shown below is the  Space Heater I have;

    I have listed some of the features of this unit below;
    • Ceramic space heater with adjustable thermostat for comfortable warmth—ideal for home or office
    • 1500-watt high setting; 3 output options: Low, High, or Fan Only; power indicator light lets you know when it’s plugged in
    • For safety: tip-over switch with auto shut-off and overheat protection with auto shut-off; ETL listed
    • Carrying handle for easy transport; not for use in bathrooms, laundry areas, or other high-humidity rooms

        If you have a four-legged friend (Furkid) traveling with you, please take note: this unit comes with Auto Shut-Off.  If the Ceramic Heater is tipped over the heater shuts off automatically.  This is a very important feature if you are traveling with four-footed friends.  There are some clumsy two-legged friends out there as well.

        Again I remind you that these LP Gas saving tips only work if you have access to a power pedestal so you can get AC power.  With these hints, the Propane Gas becomes the backup plan and not the main source of energy for your Rig.  I know from experience that these hints and tips will work.


        Until next time.


        And finally, please remember that this blog is an Amazon affiliate. When you order something through any of the Amazon links, it doesn’t add anything to your cost, but I do earn a small commission on everything you buy. 

        Thursday, April 26, 2018

        Let's Check Those Tires Again!

         While some of us are still digging out of the winter storms, some of us are dreaming about the first warm weekend of the new camping year. So what do you do first with your stored RV?  Check the tire pressure with a good tire pressure gage.  The tire's max pressure is located on the side wall of the tires on your RV.  Do not use the pressures recommended by the RV manufacture UNLESS the RV has the original tires that it came with from the factory.


        I use both a screw-on tire pressure indicator, such as Quick-Pressure-PSI-50-Monitor, which at a glance can tell you that you may have a problem [use only if your tires are supposed to have 50 lbs of air when cold. Other pressures are available]  and the traditional pencil like gauge, such as Pencil-Pressure Gauge
         Be sure to test or look at the tire pressure gage before you have moved your RV a mile.

        You need to check the tire pressure when the tire is still cold
        Another good, but pricey, system for monitoring your tire pressure as well as the tire temperature is the  Wireless Tire Pressure Monitoring System. I am saving for this one.

        Wireless Tire Pressure Monitoring System

        The system will tell you of an overheated tire, in most cases before it blows, and of course tell you of low pressure in any monitored tire, even the spare,  in real time no need to stop every 20 miles and check those darn tires - LOL.  When you stop for gas or a bathroom break you should do a tire check of the RV as well as a tow vehicle. My daughter was checking the tow vehicle for me and found a large cut in the sidewall of the truck tire.  We were able to get the tire replaced before the large accident occurred.  I did not even remember hitting or running over anything on the highway.
        Be sure to carefully look at the tread, and the side walls both on the front and the back of the tire.  Most RV tire experts agree that if your tiers are more than five years old from the date of manufacture you should replace them.  Most tire failures occur when the side wall of the tire is under inflated or rots out from the inside where you can not see.  You can thank Mr. Sun for sidewall failure in some cases.  Most tires have a Sun inhibitor built-in but when a tire sits and sits the inhibitor does not get moved to the outside of the tire by the tire going round and round.

        Now you see why you need wheel covers right? Trailer Wheel Covers for less than $25.  To protect the tires in storage from Mr. Sun and any other nasties that come along.
        You can also use an RV tire protective spray which is applied, as directed, to the tire sidewall that is exposed to the sun.  I have used RV Tire Protection Spray with good luck.  This spray is NOT designed to make the tire sidewall shinier, it is not a decorative spray, but something that is designed to put back into the surface of the rubber what Mr. Sun is taking out.
        RV Tire Protection Spray
        Also, note that if you are going to store the RV for an extended period of time you should protect the tread from the surface that the tires are sitting on.  Nasty things can leach out of your tires into the blacktop or concrete that your RV sits on while being stored. Or from the blacktop or concrete into your tires during storage.  You can use an  Office Chair Mat that sells for less than $20,
        for each side of the RV and just back onto it as you are putting the RV away.
        Or you can Go to Tractor Supply or any farm supply and pick up horse stall mats

        Cut to the size you need for just $20.  Now that is easy.

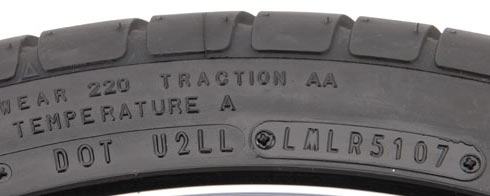
        If you are supposed to replace your tires every five years how do you know when your tires were made?  There is a code date molded into the side wall of the tire. (you can thank our government)   The National Highway Traffic Safety Administration (NHTSA) requires that Tire Identification Numbers be a combination of the letters DOT, followed by ten, eleven or twelve letters and/or numbers that identify the manufacturing location, tire size, and manufacturer's code, along with the week and year the tire was manufactured.  Since 2000, the week and year the tire was produced has been provided by the last four digits of the Tire Identification Number with the 2 digits being used to identify the week immediately preceding the 2 digits used to identify the year.

        Below is an example of a tire manufactured since 2000 with the current Tire Identification Number format:

        In the example above DOT U2LL LMLR 5107
        DOT U2LL LMLR 5107 Manufactured during the 51st week of the year
        DOT U2LL LMLR 5107Manufactured during 2007
        While the entire Tire Identification Number is required to be molded onto one sidewall of every tire, current regulations also require that DOT and the first digits of the Tire Identification Number must also be molded onto the opposite sidewall. Therefore, it is possible to see a Tire Identification Number that appears incomplete and requires looking at the tire’s other sidewall to find the entire Tire Identification Number.
        I know you are saying to yourself,  but the RV is only three years old.  We are not talking about the year your RV was built, but the year the tires were manufactured and they may be not the same so please check.   If your tire's serial number cannot be read by you, then you need to take the tire or RV to an RV dealer or tire shop and have the tires read.  Please do not be pulling your RV with old tires that may jeopardize your families safety as well as others.   [If you want more information on tire markings and such go to Tire Tech Information]

        Ok, you have checked the date code of your tires and they are in fact only three years old.  Tire pressure is up and you're ready to go.  Not so fast!

        We need to discuss lug nut tightness.  Each Spring or before a major trip you should check the tightness of the lug nuts on each of the RV tires.  You need to check your owners manual for the correct setting.  My 5er has the specifications of 100ft LBS.  I use an inexpensive torque wrench, which I keep in the RV toolbox, to confirm the setting. 1/2' Torque Wrench  To keep the wrench outside of the tire rim I also use an extender. 1/2" Socket Extension The socket size depends on your lug nut size.

        Tire Check Quick Guide 
        1. Check all RV tires for max pressure listed on the tire sidewall.
        2. Check tire tread and sidewalls for wear and cracks.
        3. Cover tires from sun damage when not using.
        4. Keep tires off of storage surface during storage.
        5. Check the age of tires yearly.
        6. Check your tires every time you stop.
        7. Do maintenance on your tires as needed.
        8. Check lug nut tightness.


        Until Next time.


        Tuesday, April 10, 2018

        What Are Those 12 Volt Sockets Good For?

        We have all done it.  Left the cell phone charger sitting on the kitchen table closed the front door, made sure everything was locked up and left for our weekend RVing get away.  If you have one of those not very smartphones you know that in 8hrs or less the phone will be dead and your Hot Spot, Weather App, and every game that keeps the kids quiet during the ride will come to an end.


        What to do?  Have you ever wondered what the 12 Volt Standard Wall Plate that looks like this is used for?
        2 Volt Standard Wall Plate 
        Or maybe you will remember this 12 volt Wall Plate with Antenna Amplifier & Switch it looks like this;
        12 volt Wall Plate with Antenna Amplifier & Switch
        Both of these wall plates have a 12-volt power socket just like your car, truck, or RV does.  You could plug a car charger for your phone or tablet computer into the wall plate and it would start to charge your phone or tablet computer.  Ah, but you say you have a charger for your phone already why would you need another one for the Rig?  If you remember you left it on the kitchen table and left for this trip.  OK, now what?  Well if you bought one of these 12 Volt Single Outlet USB Charger which looks like this;
        12 Volt Single Outlet USB Charger

        Then all you would need is either the Apple Charging Cable which looks like this;

        or the Android charging cable which looks like this;
        Android charging cable

        and you could charge your phone, table, or any USB device and never have to worry.   You say that you need to charge two USB powered devices at the same time.  Don't worry be happy and buy a Dual USB Charger which looks like this;
         Dual USB Charger
        Now all you have to do is plug in the appropriate charging cable and you are good to go.  If you need longer charging cables than 6ft you can get them up to 10ft for both Apple products and Android products.  If you would like to be able to plug the charging cable into a normal wall outlet you can buy those also.  And for those of us that want it all you can buy the USB Charging Kit Bundle  The one shown below is for Android but they have them for Apple as well.
        USB Charging Kit Bundle
        But they have the Apple Charging Kit Bundle as well, which is shown below;
        Charging Kit Bundle
        Well, that should get you going and you can just plan on leaving any of the items we talked about in the Rig for the next time you leave the charging cable and power supply on the kitchen table.


        PLEASE NOTE:  The following comments may not apply to all RVs.  Without checking the wire gauge behind the socket plate there is no way to be sure that the following products can be hooked up to the 12-volt socket in your RV.

        Along with the ideas above, you can use the power plug to power small appliances such as a coffee maker
        12-volt coffee maker

        or maybe a 12-volt frying pan.
        12-volt frying pan


        Maybe you are boondocking and would like to use your PS3, or some other video game or even some device that only runs on AC.  Then you would use a DC to AC converter.


        This would allow you to power Dual USB ports that can charge most phones and tablets simultaneously (Max 4.8A total output), while two grounded AC outlets (300-350W) great for charging a laptop, breast pump, nebulizer, game console, kindle, TV, DVD players, lights, iPad, and other electronic devices.

        The idea here is that if the park AC power fails you can use the 12 battery that powers your rigs lights, to make coffee while you wait for the power to be restored.  While you are refueling next time at a truck stop go inside a look at all the 12-volt appliance available to the trucking community that you can use in your RV or towing vehicle. [NOTE, not all 12-volt wiring can handle 12-volt appliances.]

        CAUTION:  This is not a long-term solution for power outages as your rig's battery will run down very quickly if you make dinner this way with no way to recharge your RV onboard battery now that the AC power is out.


        Until next time.


        And finally, please remember that this blog is an Amazon affiliate. When you order something through any of the Amazon links, it doesn’t add anything to your cost, but I do earn a small commission on everything you buy.